E2E Testing in Minutes with Playwright and Github Actions
E2E continuous integration testing might be closer than you think! 😃
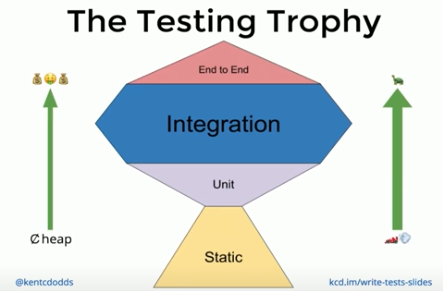
The year was 2018. Assert Conference was held in the La Orilla Del Rio Ballroom in San Antonio, Texas. During one of the presentations, Ex-Paypal-Employee-Turned-Remix-Evangelist Kent C. Dodds presents a “Testing Trophy”; a spin off from a tweet by Guillermo Rauch.
The gist was simple: integration tests.
Hopefully…
Fast forward to 2021. With deploy previews à la Netlify and Vercel, Github Actions, and Playwright we may be one step closer to E2E tests that are just as cheap as integration tests.
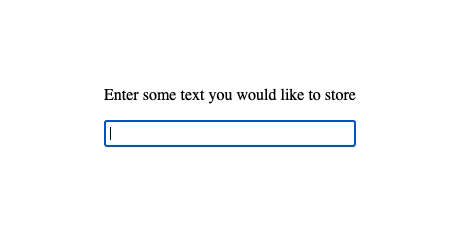
Let’s assume we’re working on a website or app hosted on netlify with deploy previews on pull-requests. Here is an example application, forged in the flames of create-react-app, that stores some text in local storage.
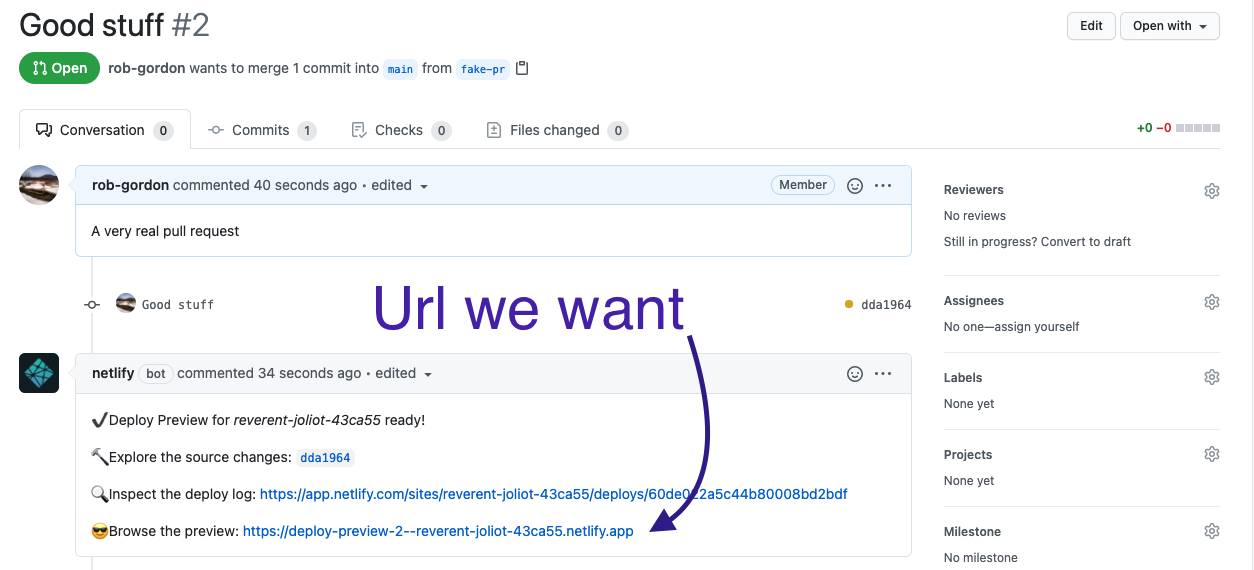
When I make PR’s I end up with a fancy netlify preview like so:
Goal
- grab the netlify preview url
- run some end-to-end tests with playwright
- sleep better at night!
Step 1
We’ll use a globally installed version of playwright so the only package we need to add to our repo is the test runner.
yarn add -D @playwright/testStep 2
Add an e2e npm script to run it.
"e2e": "npx playwright test --browser=all e2e"This is going to run any tests in our e2e folder in Chrome, Firefox, Safari.
Step 3
Create the folder we referenced above and add one test file.
mkdir e2e && touch e2e/app.spec.tsStep 4
Let’s test that our page has the correct title:
// app.spec.ts
import { test as base, expect } from "@playwright/test";

const test = base.extend<{ url: string }>({
  url: process.env.E2E_START_URL ?? "http://localhost:3000",
});

const { describe, beforeEach } = test;

describe("App", () => {
  beforeEach(async ({ page, url }) => {
    await page.goto(url as string);
  });

  test("Correct Page Title", async ({ page }) => {
    const title = await page.title();

    // Replace this with your app's page title
    //                 ⤵
    expect(title).toBe("Save Some Text");
  });
});
We use base.extend to pass fixtures (in our case url) to each of our test runs.
Step 5 – Test Locally
In one shell, start your app (yarn start for create-react-app).
In another shell, try yarn e2e. You may need to install some playwright dependencies the first time you run it, but you should see 3 tests run and pass.
For a little added spice, try yarn e2e --headed. This will open the browser window and give you some good insight into what the test runner does behind the scenes.
Step 6 – Continuous Integration with Github Actions
If you don’t already have any github actions running, create the directory .github/workflows in the root of your repo. Then add the following code a file called e2e.yml
# .github/workflows/e2e.yml
name: E2E Tests

on: [pull_request]

jobs:
  test:
    runs-on: ubuntu-latest
    steps:
      - uses: actions/checkout@v2
      - uses: actions/setup-node@v1
        with:
          node-version: 12.x
      - name: Setup Playwright
        run: npx playwright install-deps
      - name: Install
        run: yarn install
      - name: Waiting for 200 from the Netlify Preview
        uses: jakepartusch/wait-for-netlify-action@v1.2
        id: waitFor200
        with:
          site_name: "reverent-joliot-43ca55" # <-- replace with your site url
      - name: Run E2E Tests on Netlify URL
        run: E2E_START_URL="${{ steps.waitFor200.outputs.url }}" yarn e2e
If you haven’t seen a github action before, this yaml file is saying, “On pull requests, run each of these steps in order”. You can learn more about writing github actions here.
Individual steps can actually reference other github actions. The magic ingredient of our e2e tests is an action created by Jake Partusch, which waits for and returns the netlify deploy preview url. Afterwards we store the url on an environment variable and run our end-to-end script.
Don’t forget to change the site_name to your netlify site’s ID. You can
find that by logging into netlify and looking at your project.
Bada Bing Bada Boom
That’s it! You should now be able to open up a pull requests on your app, and GitHub will run end-to-end tests on the netlify deploy preview url.
Writing Better Tests
Obviously testing the page’s title isn’t going to give you much confidence in your app. Here are a few more tests I added to the demo app, to give you an idea of what playwright tests look like.
import { test as base, expect } from "@playwright/test";

type Fixtures = { url: string };

const test = base.extend<Fixtures>({
  url: process.env.E2E_START_URL ?? "http://localhost:3000",
});

const { describe, beforeEach } = test;

describe("App", () => {
  beforeEach(async ({ page, url }) => {
    await page.goto(url as string);
  });

  test("Correct Page Title", async ({ page }) => {
    const title = await page.title();
    expect(title).toBe("Save Some Text");
  });

  test("Displays user input", async ({ page }) => {
    await page.click("input");
    // Fill input
    await page.fill("input", "This is working");

    const display = await page.innerText("span.display");

    expect(display).toEqual("This is working");
  });

  test("Retains text on refresh", async ({ page }) => {
    await page.click("input");
    // Fill input
    await page.fill("input", "This is working");

    let display = await page.innerText("span.display");

    expect(display).toEqual("This is working");

    await page.reload();

    display = await page.innerText("span.display");

    expect(display).toEqual("This is working");
  });
});
One of the amazing features of playwright is the ability to generate code for your tests via the codegen CLI command. You’ll definitely want to have a look at that.
This tutorial was meant to be as bare-bones as possible, but if you think I left something important out please let me know on twitter (@tone_row_) or for typos make a PR on this article’s source code.
Thanks for reading!